
I felt that after my last entry it would be good to look at some of the different things you can do with a basic photo, with designing a bead pattern in mind. The original pic was taken and sent to me by Jean R.
Here I took the basic pic and cleaned up the background with a couple of solid colours. I chose colours that would not be too close to the colour of the fur. It's good to keep in mind the back ground can be changed pretty easiliy, so it's not as important to have just the right colour, as it is to make sure it doesn't interfer with the main image.
I also sharpened the contrast a bit more --Again we're making changes that help with pattern designing -- the pic might not even look all that great, as is -- but it will make a better pattern.
The last change was to clean up around and fix the colour of the eyes. When doing a picture of a pet, it is very important to get the eyes to come out well on the pattern. Often the eyes are what sets the expression and mood of the image. Here I hand coloured, using photoshop.

When making my first pattern I set the level at 16 colours. Then I erased the eye, and redid them with the setting on 3 colours, and not to replace already beaded areas. This prevents the eye from being a grey colour that blends too well with the fur, instead of the nice green. It also gives you a bit more control of what colors go where, without having to edit out thirt or forty extra colours. I then hand coloured parts of the pattern around the eyes - again to give a bit more expression and to delineate the eye area.
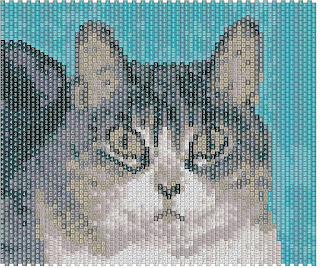
Just for comparision - here is the pattern results one would get from the unedited photo, as well as an unedited pattern. The key things to note are the fuzziness of what detail there is, and the busy background. The image of the cat gets lost.
I think it's a good example of why you can't just rely on the camera and pattern maker software to do everything for you.

Just for fun, I tried the pattern maker set on just two colours to see what I would get -- it was pretty cool. I only touched it up with a couple of strokes around the eye area. This is a great example of why it is good to play and have fun!


2 comments:
Ginger - you did an amazing job on the cat photo (as usual!!!). I'm sure Jean is delighted with the realistic version but, since I don't know the cat, I just loved the artistic b&w version!!!
Hugs, Ronit
Your "tutorials" are much appreciated, Ginger. Both those patterns came out really nice. What a difference from just "throwing" any old pic in the program. I have tried things like the oil painting edit on photos as well, before sending it to the bead program.
Cheryl
Post a Comment